Paul Thurrott recently wrote up an excellent article about how to replace your hard drive, but keeping your OS install completely intact. The secret is using Windows 7’s backup "system image" feature to create a complete, bootable image of your old drive, then restore it onto the new drive. Check out the full article for the details.
But I always end up making things more difficult for myself. When I was faced with a similar situation, I ended up taking a different route.
My desktop computer has two 500GB drives in a RAID 0 configuration (for a total of 1TB) and it seemed to work adequately. But only adequately. I didn’t seem to be getting any performance advantage over a good 7200RPM drive. Under normal circumstances, you might say “too badâ€, and leave it at that. Unfortunately, RAID 0 can be dangerous. It doubles your chances of a drive failing — and when one does, you lose all of your data. In other words, I was running with no speed advantages, and double the chances of failure. Suddenly this wasn’t looking like a reasonable risk. So when a 7200RPM 1TB drive went on sale, I bought it.
But then the question became, how do I get my existing set up onto this drive with as little pain as possible? Mr. Thurrott’s option was certainly a contender, but this is where my own insecurities came into play. I didn’t want to trust the two or three backups I had. They seemed complete when I accessed them, but a little voice kept nagging me, “what if you wipe the drive and the backups fail?â€
Yeah, I have trust issues.
Anyway, what I wanted to do was keep my current RAID intact so that I could install a fresh copy of Windows on my new drive, and just move stuff over to the new installation. If I forgot anything, I could refer back to the original drive and pull it over. No need to rely on backups (but, of course, they were there if I needed them).
I knew ahead of time that the biggest hurdle to overcome in this method was switching the boot drive. I would have two copies of Windows – one on the original RAID, and one on the new drive. Once I had everything over, I would like to wipe the RAID drives and repurpose them for something else – but that would also wipe the boot drive.
I had a few ideas for how to overcome the problem, so I went ahead and installed the second copy of Windows 7. It went smoothly, and at the end of it, I had two copies of Windows 7. When I started the computer, it gave a boot menu, with options to jump into either install. The first option was actually the new install, so I had hope that maybe Windows was somehow smart enough to swap the boot drive – but of course, that was not the case.
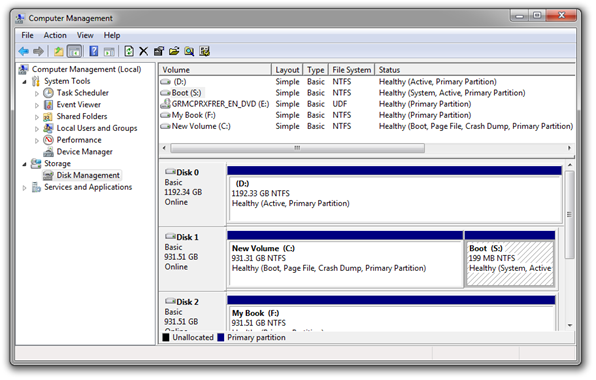
Windows 7’s excellent Disk Management console helps tell the whole story. It lists all your drives, and the partitions on them, labeled with their responsibilities. There are a lot of terms given to the different partitions, but the important ones here are “System†and “Activeâ€. There is only one Active partition on the drive, and it is the primary partition. The System partition is where Windows stores its boot environment. Without that, the computer can’t start Windows.
In my existing set up, the old RAID drive was marked as the System partition – it was the one responsible for loading the boot environment, showing the boot menu, and jumping into the chosen Windows install. Originally I was going to make the new drive’s single partition the new System partition; but, after doing a bit of research, I decided to actually create a dedicated boot partition. That way, I would always have a central spot for managing Windows installations – not that I plan on doing this sort of thing again, but you never know.
The article I ended up referring to was this one. The basic steps, adjusted for my scenario, are as follows:
- Shrink the current partition on the new drive by 200MB.
- Create a new partition in that 200MB space, format it as NTFS, and give it the drive letter of S:.
- Right-click the S: partition and make it the Active partition.
- Under the new Windows 7 install, I ran this command in an elevated, administrator command prompt:
bcdboot C:\Windows /s S: - Reboot. For me, the BIOS was still set to boot from the RAID drive. So, I switched the boot drive to the new hard drive. After doing so, it booted using the new boot partition, straight into the new Windows 7 installation.
Just to give a visual for how the drive and partition layout looks after performing this surgery, here is a screenshot of the Disk Management console:
So, I can’t imagine many people would want to do this convoluted process on their own system. But I hope the steps for creating a new boot partition are at least useful.

Why not just disconnect the rad drives while you install?
Also adjusting the bios beforehand might have prompted Windows to create the system partition on the bootable disk…
True, I could have done that as well. I guess what it comes down to is that I wanted to make as few changes as possible to the original configuration. RAID 0 always makes me paranoid that something will go wrong and cause me to lose the data. I’m probably being over cautious, but that’s the reason.